5 Tips for Better Environmental Portraits
0Comments
0Comments
A Post By: Rick Berk
Environmental portraits typically show the subject in their natural environment. They are different from traditional portraits in that they tend to show more of the character of the subject, rather than just the subject in front of a neutral background. Most people, unless they are professional models or natural hams, tend to stiffen up in front of the camera. Because your subject is in his or her natural environment, they tend to be more relaxed, resulting in better facial expressions and body language.
Environmental portraits are my favorite way to photograph people. I love it when I get a shot that makes the subject’s friends and family say ‘Oh yeah, he’s got you down!” In this article I’ll discuss five things I always keep in mind when taking environmental portraits.

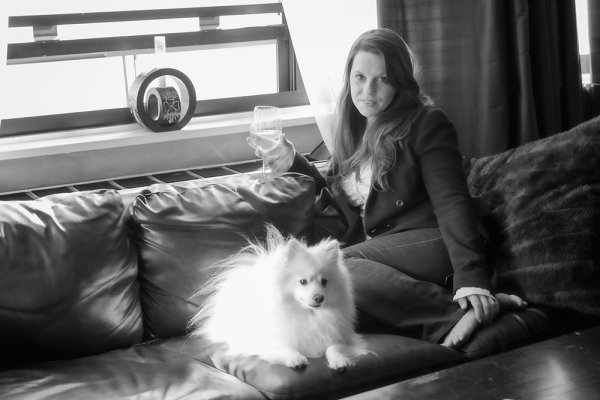
For this portrait, my client was very specific that she wanted to be captured in her apartment, just being who she is. It became quickly apparent that her dog was a very important part of that, so it was decided early that we would include him. EOS 5D Mark III with EF 24-70 f/2.8L IS II. 1/125th at f/4, ISO 640
1. Do your homework
To properly photograph someone in their environment, you need to know your subject. You don’t have to be close friends, but generally speaking, when someone asks for an environmental portrait, you want to make sure you capture who they are. Ask what they have in mind. Ask what their hobbies are. If they want a portrait in their home, what’s their favorite spot in the house? What do they do in that spot? If it’s outside the home, where do they want to be photographed? Why? You need to become a bit of a reporter and sniff out the story. Then you need to illustrate it.
2. Get them talking
Now that you know a little about your subject, what they like to do, and where they like to do it, it’s time to point a camera at them. This can be the “make-or-break” point of the shoot. If your subject is uncomfortable in front of the camera, this will come across in the images, unless you find a way to get them to relax. One of the easiest ways to get them to relax is to start a conversation. Make them forget that you are taking their photo by asking them about themselves. Have them talk about the spot they’ve chosen for the portrait, their hobbies, their families, their job – anything to get their mind off of the camera in front of them.
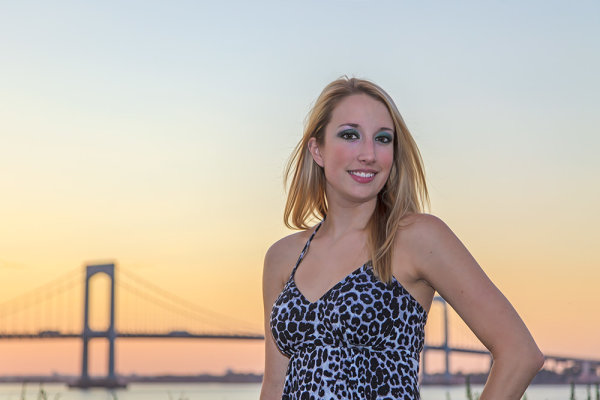
In the portrait below, my subject lives in the shadow of this bridge, and is most definitely a New Yorker. This was an impromptu session after a private tutoring session and she was reluctant to let me point the camera at her. She wanted to learn photography herself, so I wrapped a lesson into the banter and pretty soon she was just talking photography and forgetting I was snapping images.

EOS 5D Mark II with EF 70-200 f/2.8L IS II – 1/200th at f/4, ISO 100
3. Use Live View (if your camera has it)
This plays right along with item number two above. Most people tense up when you raise the camera to your eye, waiting for the image to be taken. Some may even inadvertently shut their eyes, expecting a flash. If you can use Live View on your camera, you can get it away from your face. Your subject will be looking at you, and not at the camera, and will not necessarily anticipate you pressing the shutter button. This works especially well with cameras that feature articulating screens. It can be helpful to mount the camera on tripod as well, using a remote release to trigger the camera.
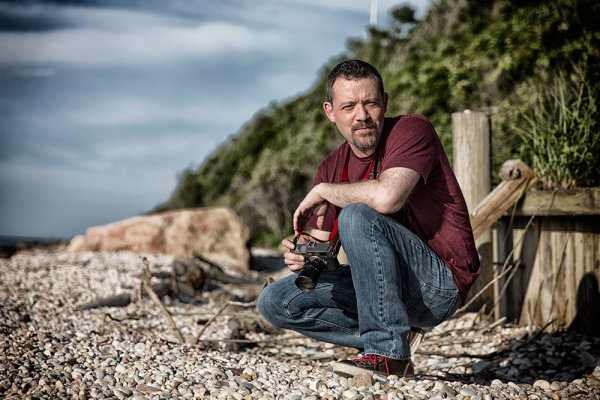
This is an image of my friend Chris (below), taken while he was supposed to be shooting me and my kids. We were discussing what shots we wanted next when I clicked this, using Live View to frame the shot and focus.

EOS-1D X with EF 24-70 f/2.8L II – 1/2500th at f/2.8, ISO 100
4. Modify the light
I try to go as minimal as possible with gear for environmental portraits, using the natural light at the location. However, there are always times where the light is less than optimal and you need to modify it in some way. This can be as simple as adding a reflector in a strategic location, or setting up a flash in a soft box or umbrella. It will all depend on what the available light is like and the look you are going for. One thing I always try to do is keep the light looking as natural as possible.
This was a business portrait, but my client wanted more than a simple headshot. It was taken late in the day, meaning I had to create my own light. She wanted her team in the background working, to show when you worked with her, she had a whole team backing her up. I used a Canon 430 EX II to light the background, aiming it off a white wall and the ceiling, out of the frame. I then used a Canon 580 EX II off camera in a Westcott Apollo 28″ soft box to light my client. I adjusted the intensity of the lighting so that the background light was at a 2:1 ratio with my main light.

EOS 5D Mark II with EF 24-105 f/4L IS – 1/100th at f/4, ISO 400
5. Don’t be afraid to shoot tight
While it’s true than an environmental portrait normally means showing some of the area around your subject – the environment – you can get close and still show your subject’s character. Take an element of your subject’s hobby, and show them participating in the hobby. If they’re a model builder, you could do a tight shot of them applying glue or assembling the pieces. This is your chance to be creative, trying different angles, focusing on different aspects of their personality and character. Emphasize features that stand out, in a flattering way, if that’s the goal. Find out what makes the person in front of your camera special, and capture it!

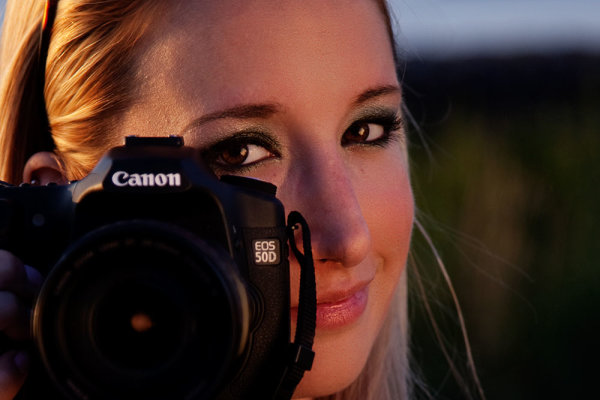
EOS 5D Mark II with EF 24-105 f/4L IS – 1/250th at f/4, ISO 100
This is the same girl as the shot in front of the bridge. She’s a photographer as well now, but back then she was just a hobbyist who wanted to know more about her camera. I used the beautiful sunset light I was getting, and set up a reflector to camera right to bounce the light back into her face. I wanted her peeking out from behind her camera, illustrating that she’s into photography.
Do you have any additional tips you’d add to this list? Please share in the comments below.
For more portrait photography tips check out these articles:
If you enjoyed this article, you might also like…
Read more from our Tips & Tutorials category.
Rick Berk is a photographer based in New York, shooting a variety of subjects including landscapes, sports, weddings, and portraits. Rick’s work can be seen at RickBerk.com and you can follow him on his Facebook page.
If you enjoyed this article, you might also like…
-
A S
Typo — the lens used in the first example does not exist.
-
Angela Harrington
-
Johan Bauwens
The white Pomeranian is overexposed, there is no detail in the white coat on it’s back.
-
Johan Bauwens
The Canon 24-70 mm f2.8 II does exist (it’s about 2000 euro) but it doesn’t come with IS.
Join 1,417,294 Subscribers!
Polls
Do you shoot in the rain or inclement weather?
Join Our Email Newsletter |
|
Join 1,417,294 Subscribers!
Join Our Email Newsletter |
|


Receive a FREE SAMPLE of our
Portrait Photography Ebook

- Guaranteed for 2 full months
- Pay by PayPal or CreditCard
- Instant Digital Download

Receive a FREE SAMPLE of our
Portrait Photography Ebook

- Guaranteed for 2 full months
- Pay by PayPal or CreditCard
- Instant Digital Download

Receive a FREE SAMPLE of our
Portrait Photography Ebook

- Guaranteed for 2 full months
- Pay by PayPal or CreditCard
- Instant Digital Download

Sign up to the free
DPS PHOTOGRAPHY COURSE
- Guaranteed for 2 full months
- Pay by PayPal or CreditCard
- Instant Digital Download
![]() GET DAILY free tips, news and reviews via our RSS Feed
GET DAILY free tips, news and reviews via our RSS Feed


Sign up to the free
DPS
PHOTOGRAPHY COURSE

- Guaranteed for 2 full months
- Pay by PayPal or CreditCard
- Instant Digital Download

Sign up to the free
DPS
PHOTOGRAPHY COURSE

- Guaranteed for 2 full months
- Pay by PayPal or CreditCard
- Instant Digital Download


