“Fujilfilm XM1 Review [and XA1/XE2 Thoughts]” plus 1 more: Digital Photography School |
|
|
Fujilfilm XM1 Review [and XA1/XE2 Thoughts] Posted: 04 Nov 2013 10:57 AM PST A review of the Fujifilm XM1 by Ben Evans from www.EnglishPhotographer.com. I knew mirrorless cameras were the future when Fujifilm launched their X-Pro1. Small and light like a Leica but with the practicality of autofocus, it had the image quality to live up to its name. When Fujifilm put the same innovative X-trans sensor in the X-E1 I recommended it over its bigger brother.
Well, they’ve just done it again; the new X-M1 has the same amazing sensor in a smaller, lighter, cheaper camera body. Don’t confuse it with the X-A1, which doesn’t have the X-trans sensor. Or with the X100s, which can’t change lenses. Or with the XE-2, which is better but more expensive. We’re paying less, so we get less. What’s missing; and what do we miss? [embedded content] The X-Pro1 had a hybrid optical and electronic viewfinder and the screen. The X-E1 lost the optical viewfinder so action and low-light photography was trickier, but gave us an upgraded electronic viewfinder (apparently from Sony’s top-end RX1). The X-M1 has no viewfinder so you have to compose with the screen. In practice this means less battery life, shakier pictures and poor visibility in bright light. But now the screen tilts, which I like.
Gone also is the svelte metal toughness of the X-Pro1, replaced with pretty plastic. But gone too what little weight was there before. I carry too much, so lighter wins every time. If I wanted tough I’d get a Pentax. The kit lens is back to being a kit lens; cheap and slow with a maximum aperture from f3.5 to f5.6. This also means slower focussing in low light. There’s no aperture control on the lens nor switches for manual focus or stabilization. It’s pretty small and image quality is okay. But better to buy a proper X mount lens; the 35mm f1.4 beats all of Leica’s (it has autofocus!) and Zeiss now supports the system too. Fuji have a sensible roadmap for new lenses, which makes building a kit viable. With the same lens, the image quality of the X-M1 should match its pricier siblings. Reading around, it seems the different chip may diminish quality slightly, but this could be that the jpegs are tuned to the consumer’s taste for stronger noise reduction and more sharpening.
You also lose out with the controls. The X-M1 is a machined metal dial short of a immersive user experience. You’ll get used to it but its no X-Pro1. But for people who’ll just be using auto or program it’s really excellent and the quick menu is very helpful. Technology gets faster, and technology gets smaller. The X-M1 is as small as we’d want to go. Some manufacturers have made the mistake mobile phone makers made a few years ago; sacrificing usability for diminutive size.
This points to a characteristic of Fujifilm; they seem to understand what photographers want. Why? They listen. The XE1 had slow autofocus; the XE2 addresses this. The X Series cameras were a bit pricey for many people; the XM1 and XA1 were launched. It’s a pleasure to see a tiltable LCD screen on both. But there’s a flaw in that clichéd Capitalist aphorism, ‘give the people what they want’ – as Steve Jobs made a billion proving, often they don’t know until you show them. And so it is; the rush to flesh out the X system has led Fujifilm to launch too many cameras, too quickly.
Looking at the images, for the bodies are almost identical, the XM1 has only a small advantage over the XA1. So why pay more? Looking at the XM1, it’s difficult to ignore the similarly priced XE1s rendered obsolete by the XE2. They’re all great cameras, but what’s to choose between them? It comes down to how you’ll use it. Photographing an international event for charity that required social media engagement, the XM1 with its built-in wifi was the right choice; it’s simple enough to edit the images on a phone using Snapseed them upload them. The wifi is useful then; but surely it would be worth hiring an app developer to enable proper remote control of the camera too.
If you’re able, spend a bit more on the XE2 or the X-Pro2 if/when it’s announced. The quality will be a bit better, and you’ll benefit from faster focussing. Otherwise, compare the used/ end-of-line price of an XE1 against the XM1 and XA1, weighing up wifi and a tiltable LCD on the XM1/XA1 against slightly better quality and a viewfinder (XE1). Ultimately, it’s the quality problem of too much choice; pick one and just photograph with it!
Check out the new Fujifilm X-Series Video [embedded content] Ben Evans is the author of Photography: The Few Things You Need To Know, available at www.GreatBigBear.com. He is an English-speaking Barcelona photographer – www.EnglishPhotographer.com teaching photography with www.BarcelonaPhotographyCourses.com.
Post originally from: Digital Photography Tips. Check out our more Photography Tips at Photography Tips for Beginners, Portrait Photography Tips and Wedding Photography Tips. Fujilfilm XM1 Review [and XA1/XE2 Thoughts] The post Fujilfilm XM1 Review [and XA1/XE2 Thoughts] by Guest Contributor appeared first on Digital Photography School. |
|
How to Photograph Strangers: The 100 Strangers Project Posted: 04 Nov 2013 07:17 AM PST A Guest submission by Matt John Robinson
The First StrangerTaking the portrait of a person whom you’ve just met moments before is one of the most exciting—and in the beginning, unnerving—experiences you can have as a photographer. It’s also one of the most rewarding. The 100 Strangers Project sounded simple enough: gather 100 portraits of complete strangers after getting their consent. For my mostly introverted self, this meant more precisely: interact with 100 human beings I would otherwise never interact with…AND take their photograph.
The prospect seemed filled with anxiety. Yet the intrigue and amazing possibilities that gathered vaguely in my mind were becoming too palpable to resist. I had seen and greatly admired many 100 Strangers photos by Chris Camino, an online photography contact who was working on the project (known on dPS and Flickr as Paco X). When I realized that a few of his portraits had been taken only an hour away from me, I had to know more. “How does he do it? How does he interrupt people during their daily routine and so boldly ask for their picture? How do they react, and why would they ever say yes?” Chris was happy to share his process and agreed to have me tag along during his next stop in Philadelphia. He was honest. He was direct. Chris would see something in a stranger and would stop them, letting them know exactly what he admired and why he wanted to take their picture. The stranger, more often than not, would agree! They might even ask how he’d like them to pose; they might even walk to a more appealing background; they might even glow with the flattery of somebody wishing to take their picture. These strangers, for however brief the encounter, would connect with this photographer. They would trust him.
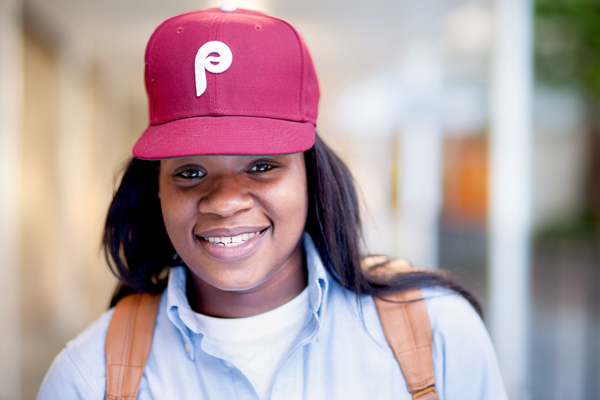
It was a rush just watching it unfold before me. I knew I wanted to feel the excitement of photographing a stranger myself. I saw a few interesting strangers and would point them out to Chris, secretly hoping that he would goad me into taking their picture myself. And he would. But I wouldn’t. My courage would build up—almost to the point—and a wave of nerves would wash it all away. What if they refused? What if they thought I was just a creep? Chris spotted another stranger walking across the street with a friend, and I ambled after him. His stranger agreed very kindly after he introduced himself and me. The woman and her friend were both lovely and seemed like very warm and open people. It occurred to me that this was the perfect opportunity: I had already half-met this “stranger,” the woman’s friend, and judging from her personality she was likely to agree. While Chris was busy shooting, I walked over to his stranger’s friend with as much an air of confidence as I could muster. I told her that I very much wanted to start the same photography project and wondered if she was willing to be my very first stranger. Not only did she agree to have her portrait taken, but she was flattered to be the start of the project. After the shoot, as she started to walk away, she turned and called back with her bright smile, “Thank you for your kindness.” Thank you for my kindness!
I was blown away. So blown away and filled with excitement over my first ever street portrait that I forgot the young woman’s name. But I am oh-so-grateful to have met my unnamed Stranger #1 in her Philly’s ball cap. She opened my eyes to how easy and instantaneous it can be to connect with people you’ve never met, and how truly kind a complete stranger can be. And the greatest revelation: I, as a photographer, have the power to capture the beautiful qualities of anybody I pass by. Or I can at least make the attempt. And anybody with a camera has that power. It might seem silly to photographers who’ve been doing this for ages, but I really think it’s something a lot of photographers haven’t thought about. I certainly hadn’t.
It was addicting. A piercing set of eyes, an awesome sense of style, or just a charismatic air—it’s all gloriously walking on the street and waiting to be captured by a camera. I returned to Philadelphia several times and also shot at a few places more locally. I’m a little over halfway through my project now. No matter where I go, though, it’s all the same. I wait until I find somebody with some quality that I want to capture and then simply walk up to them and introduce myself and the project. Often I will let them know what caught my eye. And the majority of the time these strangers agree… and then it’s time to think about the photo.
How to: the Posed Street PortraitThe technical considerations I make for posed street portraits are identical to any that you might make when taking any sort of outdoor portrait. You just have to figure it out a little more quickly. I almost always make an attempt at carefully pairing my strangers with their backgrounds. Sometimes I will find a background first, and I’ll wait for a serendipitous stranger to happen upon me. Other times I’ll come upon a stranger without having the time to consider a background before addressing them. In that case, I will always ask if they mind if we continue to walk in the direction they were headed until a suitable background catches my eye (it’s amazing how accommodating the strangers usually are). It’s just my own personal style to really “create” the portrait. Other street portrait photographers take the opposite approach and prefer to photograph their subject exactly where they found them. The hugely popular Humans of New York photographer Brandon Stanton asks, “Can I take your picture, just like that, right where you are?”
100% of my backgrounds are in the shade. I like soft, even lighting, as most portrait photographers do. Working with shade also gives you the ability to shoot any time of day, and midday is actually quite nice. While cloudy skies are appealing because of the ability to shoot out in the open, bright sunny skies make for beautiful shade. However, not all shade is equal. Sometimes the shadows can still be too heavy depending on how far you are from the open sunlight. For instance, if you’re in the shade of a building, yet there is open sky above you and all around, the lighting may very well be ideal on its own. However, if you’re under the shade of a tree, or on a street surrounded by shade with tall buildings on each side and only a thin strip of open sky, a reflector is usually going to help a lot. Aside from what’s above you, what the stranger is facing is also important when considering the lighting. If you’re in the shade of a building, and your subject is facing other buildings in the shade, there is hardly any light being reflected sideways and up, so the eyes are going to appear very dark. On the other hand, if the subject is facing buildings/sidewalks/streets that are brightly lit by the sun, their eyes will be nicely illuminated by the reflected light, and you’ll capture a nice catch-light. For those times when there’s not much open sky or bright surroundings outside the shade, carrying around a collapsible reflector is extremely helpful. You can expand it and have the subject hold it themselves around waist or chest height, depending on the framing, angling it slightly toward their face. This works well when the light is still generally coming from above. Sometimes, depending on the structures around you and the time of day, the light mostly comes from the side. In this case it is helpful to have somebody hold the reflector on the opposite side the light is coming from (the subject is unable to do this without getting the reflector in the frame), bouncing back the light onto the shadowed side of the face. The strangers I stop often have friends along with them, and they’ve always been happy to assist with the reflector. As soon as the reflector is busted out, the stranger is likely going to ask how you want them to look/stand/pose.
Posing the stranger can be the second hardest part for a lot of people just getting started, right after the approach. The simplest way, and the way I still use sometimes, is to not even bother with a specific “pose.” I’ll just ask them, “Ok, let’s get a few straight-faced shots—no smile.” And then after a few frames, warm them up with a joke or two and try to get them smiling (or just ask them to smile). The way they are standing and holding their arms isn’t important if you’re just shooting head shots. The pose matters when moving out from the head shot, and for that, I’ve done all sorts of things. You can just start backing up and capture their natural pose while they’re not fully aware that you’re actually capturing the entire body (this is all assuming you’re shooting with a prime—zooming out from the head shot and continuing to fire away would work great as well). One of my personal favorites is to have the stranger sit down in a specific location that I think will work well with them. I’ll sit down myself exactly where I want them to sit and show them generally how I would like them pose. The stranger will follow suit with their interpretation and usually ask for more direction. I’ll follow with something like, “However your body feels comfortable,” and then start taking photos. At that point I’m looking through the viewfinder and beginning to frame my subject.
When it comes to composition, I am a heavy “rule of thirds” guy, especially with the eyes. The rule of thirds isn’t as much a “rule” as it is a way that our visual system scans the frame. For whatever reason, placing key points of the photograph on the thirds lines, or at their intersection, really focuses our attention during visual processing. This is dramatically true for portraits especially. Placing the subject’s eyes on (or above) the upper third line gives them a much larger impact (try it yourself: on the same image with two different crops, place the eyes on the middle horizontal line and then place it side by side with the eyes on the upper third line). I also avoid the “floating head.” That is, I almost never frame the subject from just their neck up, leaving their face to be the only thing in the frame. Including a good part of the shoulders in a headshot is key in grounding the subject within the frame and giving them their proper space. It’s a similar element to not cropping the subject at the knees or elbows. There are of course exceptions to both of these compositional guidelines (you can see them in my own portraits), but they are a great place to start and it’s hard to go wrong when following them.
And finally, the lens and camera settings. Choosing the lens greatly depends on how much of your subject you’re really aiming to capture. I focus primarily on head shots because of the intimacy it provides through a strong connection with the eyes. Because my primary goal is to come away with a good head shot, I always shoot street portraits with my 85mm f/1.2 lens. I love the 85mm focal length for several reasons. For one, there is no distortion. Shooting a headshot with a 50mm or wider is going to make the center of the face appear subtly bulbous (and super bulbous if you’re down in wide angle territory). This can be mostly corrected in post, but why not get it right in camera? More importantly, the 85mm gives you perfect working distance, which is especially important when working with strangers. Standing two feet in front of a stranger with a 50mm lens to get a head shot can feel pretty “in your face” for them. With the 85mm, you’re a bit further back, yet you’re close enough to easily continue communication—to continue chatting and helping them to feel comfortable. Conversely, if you’re shooting a 200mm, you’re going to be pretty far away, and may have to raise your voice a good bit. You begin to lose your subject’s connection to the camera. And in a street setting, you really might not have enough room to back up, especially if you’d like the option to capture a full length. I almost always shoot with a very large aperture for head shots in order to isolate the subject through a shallow depth of field as much as possible. For my personal tastes, I don’t mind having the ears and tip of the nose blurred. In my opinion it just places even more emphasis on the eyes, and well, I am in love with a good pair of eyes. It also naturally softens the skin of the forehead and cheeks, which is an added bonus. I shoot in manual, choosing my aperture and then adjusting my shutter speed to properly expose. I won’t shoot an SS below 1/100 and will boost my ISO if needed from there.
I hope this post was helpful for anybody interested in outdoor portraiture, and especially those who might be interested in starting this amazing street photography project. It’s a no-brainer that my people skills have improved and I’m a lot more comfortable interacting with complete strangers. And of course, my portrait photography has improved a great deal. All the while, it has been so much fun. If you’re interested in the project, check out our Flickr group for the 100 Strangers Project. Matt John Robinson is a portrait photographer from Allentown, Pennsylvania. See more of his work at www.mattjohnrobinson.com and connect with him on Facebook and Flickr.
Post originally from: Digital Photography Tips. Check out our more Photography Tips at Photography Tips for Beginners, Portrait Photography Tips and Wedding Photography Tips. How to Photograph Strangers: The 100 Strangers Project The post How to Photograph Strangers: The 100 Strangers Project by Guest Contributor appeared first on Digital Photography School. |


| You are subscribed to email updates from Digital Photography School To stop receiving these emails, you may unsubscribe now. |
Email delivery powered by Google |
| Google Inc., 20 West Kinzie, Chicago IL USA 60610 | |