One of the most popular subjects of photography is people (portraits). Therefore it is no surprise that many of us take photos of people with our iPhones as well. However, there can be a big difference between just taking a snapshot of someone and creating an artistic portrait. Read on for some ideas on how to move beyond simple snapshots of people and create high-quality portraits with nothing more than your iPhone.
1. Embrace Spontaneity
When many people hear the word “portrait” they often think of formal portraits that they may have taken at a professional studio. However, one of the joys of mobile photography is that it frees you from so much of the formality of formal portraiture.
iPhone portraits can certainly be formal, but they can also be wonderfully spontaneous and full of energy. The mobility of an iPhone allows you to capture moments as they unfold before your eyes with little preparation.
Try to anticipate a good portrait opportunity and keep your iPhone’s camera ready to go so that you can react as quickly as possible to whatever situation presents itself to you. This is especially important if you are trying to capture photos of children in their natural state of energetic play.

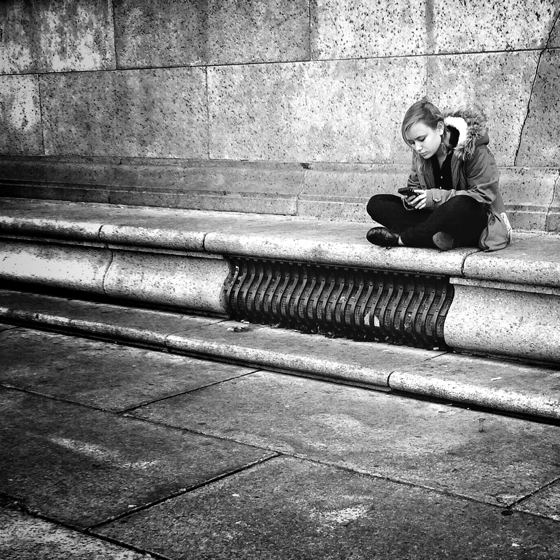
2. Hit the Streets
Street photography takes spontaneous portraiture about as far as it can go. Not only does this type of portrait work require awareness and readiness, but it requires a bit of stealth too. Unless you are willing to approach your subject on the street and ask permission to take their photo (which can cause them to stiffen up and pose), you need to be able to take a photo without them realizing it.
One of the most popular techniques for doing this is often referred to as shooting “from the hip”. What this refers to is simply holding your phone in an inconspicuous manner while taking a shot. Some popular positions for doing this include holding your phone by the side of your hip, against your ear like you are making a phone call, etc.
So how do you actually release the shutter when shooting in this manner? While it is possible to use the button on the screen of your iPhone, it can be a bit awkward. The better option is to use the “up” volume button on the side of your iPhone (“hardware” shutter release). Some camera replacement apps require you to activate this option in their settings, but if you use the native iPhone camera, it is enabled by default.
By using the volume button, you don’t have to worry about placing your finger on the right part of the screen without actually looking at it. Alternatively, you can use the volume button on the standard earbuds that come with your iPhone as another form of hardware shutter release. This option has the additional advantage of allowing you to appear as if you are simply listening to music when, in fact, you are taking photos!
One last note about street photography: while such a practice is perfectly legal in most countries/regions, be sure that you are not violating any laws in your area before taking photos of anyone without their permission.
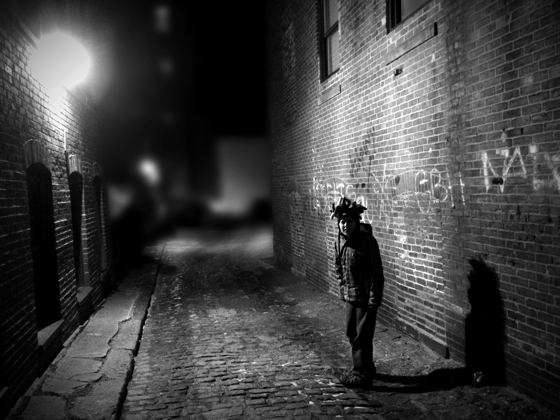
3. Make Use of Available Light
Examine your situation for favorable lighting options. There are many ways to use available light to your advantage when shooting portraits, and you will likely have at least a couple good options available to you regardless of your situation.
Place your subject near a bright window for a strong, yet somewhat diffused light. Observe the difference in the quality of light on a sunny day vs. an overcast day and use these differences to your advantage.
Look for unique artificial lighting options such as a bright floodlight, moody streetlight, or even candlelight (provided that you use a tripod). Available lighting may not always offer as much control as studio lighting, but it can yield far more dramatic effects if used properly.
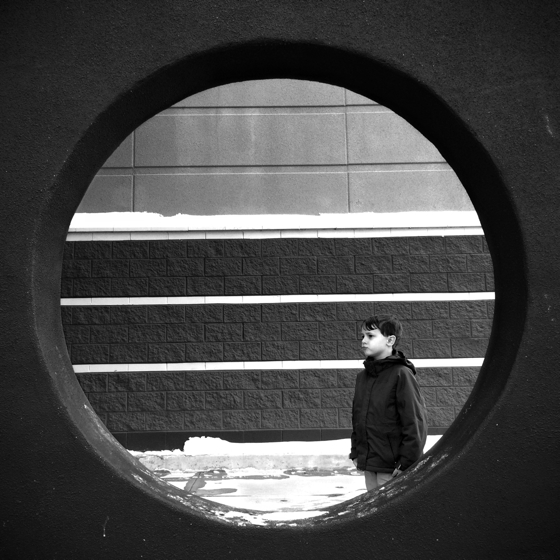
4. Keep One Eye on the Background
As a rule, simple backgrounds are better for portraits as they don’t detract from your main subject. That being said, there are times when a busier background may contribute to the overall image. This is especially true in some instances of street photography. Just remain very aware of the background in your image, and you should be fine.
5. Focus on the Eyes
A general rule of portraiture that applies equally well to iPhone portraiture (except perhaps the aforementioned street photography) is that you should always adjust your focus so that the eyes of your subject are as sharp as possible. In just about any portrait, the eyes are what first capture the attention of the viewer. Therefore, be sure to use the selective focus of your camera app to focus on the eyes of your subject. This is critical for nearly all forms of portraiture.

6) Expose for the Face
Similar to focusing on the eyes, it is typically best to set your exposure (if your camera app allows it) for the light coming off of the face of your subject. This will typically yield a balanced overall exposure in most lighting situations, and it allows for easier editing to achieve good skin tones regardless of whether you prefer to edit your photos as color or black and white images. If in doubt, it’s best to slightly underexpose your photo as it’s easier to recover good tones from an underexposed image than an overexposed image.

7. Watch Those Highlights
If you do a good job of setting the exposure when capturing your image, this step should be fairly easy. When editing your photo, look at the face and other skin tones for excessive highlights where the tones are completely washed out (pure white with no definition/detail). This is especially important when changing contrast and/or brightness as these are the adjustments that are most apt to cause highlights to wash out if you overdo them.
If you do notice areas of skin tone washing out when making adjustments, simply reduce the levels until the highlights just disappear. This typically leads to a good balance of tones, but you may still need to make slight adjustments. Remember, small highlights are usually fine and can actually be pleasing to the eye depending on where they fall. Too many highlights, or a large single highlight just makes people look like ghosts.

8. Balance Your Contrast
Personally, I like photos that lean more toward the high-contrast end of the spectrum. Therefore, I typically raise the contrast level of most of my photos quite a bit to achieve that “pop” that a strong level of contrast adds to a photo. However, this isn’t always a good thing with portraiture.
As mentioned above, raising your contrast level too high can result in washed out areas of skin tone, even if it doesn’t fully wash out, it can still make your subject (especially if they are fair-skinned) appear overly pasty and ghost-like. I recommend finding a good balance for your contrast level that is low enough to avoid washed out highlights, but still high enough to give good tonal separation and make your photos “pop”.
A good rule of thumb is to adjust your contrast levels with the eyes of your subject in mind. Adjust your contrast so that the whites of the eyes are as white as they can be without washing out other highlights of your photo. You may even wish to use a “selective adjust” or masking tool to only adjust the contrast level of the eyes themselves and leave the rest of your photo untouched.
In my own portrait work, I find that it is best to make my typical contrast adjustments for the photo as a whole and then back them off just a bit (reduce contrast levels). I may also slightly lower the brightness. This is especially important in black and white portraiture as it is more difficult to represent good skin tones in a monochromatic medium.

9. Crop, Don’t Zoom
Never, and I repeat never use the digital zoom of your iPhone. Doing so always results in a loss of detail and yields a low-quality image. Depending on the camera app you use, you may even be able to deactivate this feature altogether so that you don’t accidentally engage it even a small amount. Zooming is best done by physically moving closer to your subject. If this isn’t possible, then simply crop your photo as part of the editing process.
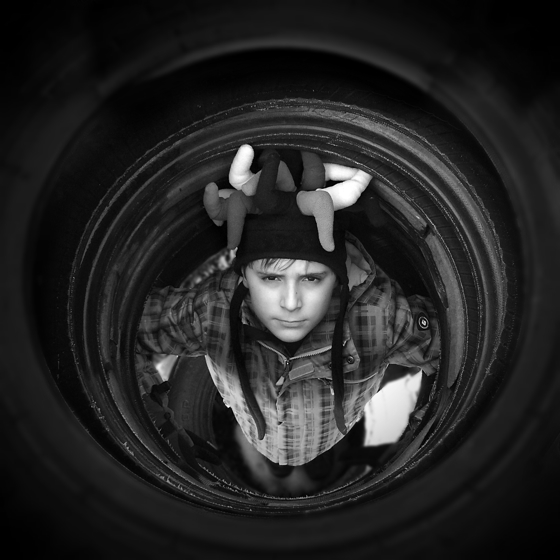
10. Break the Rules
Now take everything that I just said and forget about it… Well, maybe not completely.
One of the interesting things about portraiture is that it is one area of photography where it is easier to break some of the standard rules of composition. For example, it is perfectly fine to place your subject in the center of your picture in portraiture. In fact, as long as your subject is looking directly into the camera, the viewer will be immediately drawn to the eyes of your subject, so it is less relevant as to where you position them in the frame.
This certainly doesn’t mean that you can place them anywhere and achieve a great photo, but the standard rules of composition are less relevant in portraiture as it is more about the eyes of your subject and how they capture the attention of the viewer. In many cases, you will still find that it is best to place them according to the rule of thirds or other such standards. However, you may also find that they work even better in a more atypical position within the frame.
You may also find that other “rules” explained above simply don’t apply to a particular idea that you have for a great portrait. That’s great. These tips are all tried-and-true techniques that will help you to become a better portrait photographer, but they are certainly not the last word in portraiture technique. Experiment a bit and see what works. Try something completely crazy as you never know… It just may work!

Conclusion
So are these the top ten tips for taking better portraits? Not necessarily, but if you find yourself struggling to capture great photos of people whether posed or candid, these tips should help to jumpstart your efforts.
One last tip (I guess that makes it number eleven) is to study the portraits of other artists that you admire. There are plenty of brilliant portrait artists on Instagram, EyeEm, and other online communities, but don’t forget about print books. Photography books can sometimes be expensive due to the high printing costs of reproducing photographs (especially in color), but your local library likely has a great selection of books to check out as well.
Happy shooting!
About The Author
A long-time photographer with a particular love of black and white imagery, Rob DePaolo is passionate about the new medium of mobile photography and is always on the lookout for new tools and techniques for the creation of great photos. Rob loves sharing his ideas and experiences in order to help others go from taking simple snapshots with their mobile phones to creating serious art.
robdepaolophotography.com | Instagram | EyeEm | AMPt
If you enjoyed this tutorial, please join over 3647 subscribers who receive exclusive iPhone photography email tips that you won’t find anywhere on this blog.
21
FEB