Are you looking to try your hand at black and white (B&W) iPhoneography but don’t know where to start? Are you a B&W artist looking for new techniques to help you grow your monochromatic skills? This article offers a number of tips to help you improve your B&W photography whether you are just getting started or have been creating B&W images for some time.
Why B&W?
When photography was first invented, monochromatic imagery was all that was available. However, color photography has now been around for so long that no one alive today knows a world without it. Why then, in such a colorful world, would we still be attracted to B&W photographs?
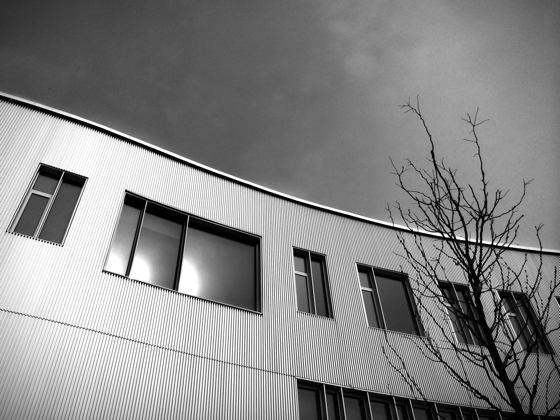
For me, the answer is simple. By stripping away most colors (I say “most” as opposed to “all” as black and white are still colors) B&W photos allow other aspects of the image to take center stage. In particular, the qualities of light, tone, and texture are what I tend to focus on.
Without light, there would be no photography. However, sometimes the subtle effects of how light falls in a photograph can be overshadowed by the vibrant colors of the same image. With B&W photos, the light itself tends to stand out more and can become another “subject” of the photo (if not “the” subject). The opposite is also true in that the shadows can be more pronounced (in contrast to the light) and also play a bigger role in the image.
Tone is a bit more vague, but what I am referring to is the way a B&W photo renders the various shades and hues of color as grayscale. If processed correctly, the gradations in the gray tones can be quite beautiful and help to accentuate the lines and shapes of your subject(s) in ways that are not always as apparent with color photography.
Texture (or in a broader sense, shape itself) is fairly straightforward, but what may not be immediately obvious is that what makes the texture of your subject “pop” in B&W photography is the interplay of light and tone mentioned above. While we notice textures all the time in our daily lives, seeing them through B&W imagery really let’s us focus on the tactile qualities of the texture, albeit in a visual manner.
As you can see, these three qualities are all interdependent and work together to make B&W photography the beautiful art form that it is. Now let’s take a look at some simple ways for you to dive deeper into this wonderful world.
1. Learn to See in B&W
Using the above discussion for reference, try to train your mind to see beyond the colors in front of you and focus on the more subtle qualities of light, tone, and texture. This can take some time, but don’t give up. Soon you will start to retrain your mind to see these qualities more clearly so that you can better compose for them and bring them out in the editing process.
2. Shoot in Color
This may seem like a paradox, but if you shoot in color first and then convert to B&W later, you will typically have more image detail to work with. This allows for a wider, deeper range of gray tones than if you shoot with a B&W filter applied in the camera app you are using.
The biggest problem with using B&W filters in camera apps is that some of those B&W presets are fairly high in contrast, which can be a good thing depending on the effect you are trying to achieve. However, if you start with a high contrast image, it is hard (if not impossible) to bring out more of the mid-tones in the image. It is actually easier to start with a flatter, slightly underexposed image and work from there as more image detail is preserved in the original photo.
In addition, by shooting in color, you may realize in the end that the color version of the image works better, and you can then proceed to edit the photo to that end.
3. Shoot in B&W
Wait a minute… Didn’t I just say to shoot in color? Yes, and I believe that ultimately, that is the best approach (similar to a RAW image in DSLR photography). However, it can be beneficial to use B&W filters when shooting as you can quickly see the results of your effort rendered in grayscale, which can help to train your eye for B&W photography. There is also the added benefit of the cool effects that many B&W filters have to offer.
Hipstamatic and Oggl are very popular choices for this sort of “set it and forget it” shooting when you want to minimize the amount of editing you do afterward. You may find certain filters work well for your preferred style, or you may simply gain some ideas from them as to how you might manually edit your regular images through post-processing.
Experimenting is always good with iPhoneography, and there are a wealth of apps to help you in this area.

4. Watch Your Exposure
In order to maximize the tonal range of your B&W photos, pay close attention to the exposure setting on your iPhone. This is easiest done with any number of camera replacement apps that allow you to set the exposure point separate from the focal point. As long as you are not trying to capture a moving subject, take a moment to adjust the exposure point so that you end up with an evenly exposed image with little to no washed-out highlights.
It is next to impossible to bring any detail out of overexposed areas when editing. If in doubt, it’s better to slightly underexpose your image as it is possible to bring out the highlights by increasing brightness and contrast while retaining all of the image details. If you underexpose too much, you will have a problem similar to overexposure in that the shadows will not yield any detail no matter how much you raise the brightness of those areas.

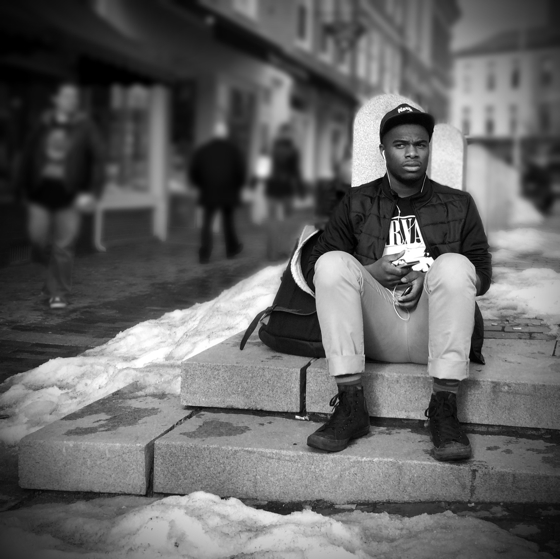
5. Study Skin
When shooting portraits, pay close attention to the tones of the skin. Setting your exposure point for a neutral skin tone on your subject (not washed out nor in shadow) will often yield the best exposure for rendering an accurate skin tone and typically results in a great exposure overall. The nice thing about this technique is that it is almost irrelevant as to the actual skin tone of your subject as the exposure will be based off of their unique tone every time.
6. Edit in Color BEFORE You Convert to B&W
This harkens back to my earlier point about shooting in color before converting to B&W. Another technique that I often employ is to do 95% of my editing with the color version of a photo to make it as good as it can be in that format. Then, in addition to having a final color photo, it is only a couple of quick steps to a final B&W image as well.
By editing in this manner, you can get most of the detail work out of the way in terms of brightness, contrast, etc. Even adjusting the saturation level of the colors helps to render more accurate gray tones in the final B&W image. After converting the image to B&W, I typically find that I only need to make subtle adjustments to the contrast and sometimes brightness to end up with a B&W photo that I am happy with. The reason for the extra adjustments is that color adds a natural contrast to a image that can be lost in grayscale when you have less colors to play off of each other.

7. Utilize Detail Adjustments When Converting
I have found that using editing apps that offer a higher degree of manual control over the conversion process tend to yield a better monochromatic image. Most of my friends know that I am a huge Filterstorm Neue fan. The reason for this is simple. This app offers a wide range of editing control that isn’t found in most other mobile apps. It is almost like having desktop photo editing software on your iPhone. However, there are many other apps that offer a similar level of control in the conversion process, so please experiment and find what works for you.
In most cases, any editing app that provides this level of control will allow you to adjust the intensity of the red, green, and blue (RGB) tones as they are converted to B&W. By increasing the adjustment for red, for example, areas of original photo that were red in tone will be rendered lighter in the B&W version. If you lower that same adjustment, red areas will appear darker in the final B&W image. The same holds true for green and blue.
In order to obtain good skin tone when shooting portraits, I find it works best to work with the green and blue levels during the conversion process. For lighter-skinned subjects, I find that raising the green level and lowering the blue level helps yield the best results. The key is finding a balance that doesn’t result in any washed out highlights as it is easy to end up with too high contrast level using this method. Just take your time as the results are worth it.

8. Its All About Contrast
This has been mentioned plenty of times above, but it is so important that it deserves it’s own note as well. B&W photography relies heavily on the contrast (or lack thereof) between black and white tones in the image. Always keep this in mind when editing and consider all of your adjustments in light of how they affect the contrast for your photo. The specific level of contrast is entirely up to you and your personal aesthetics.
9. Experiment with Vignettes
Vignettes work in both color and B&W photography, but I find that their effect is heightened when working in monochrome as a black (and sometimes white) vignette helps to bring out the contrasting light and dark tones much like using a matte when framing prints.
Many photo editing apps offer a vignetting effect, but the actual effect can vary from one app to the next. Some, like Noir, allow for adjusting the position of the center point of the vignette, while most others only let you adjust the radius (from the center only) and the level of falloff. Choose the tool that works best for you and experiment, don’t be afraid to mix it up and combine vignette effects for even more dramatic results.
10. Study Others
One of the most effective ways to learn more about B&W photography is to study the works of others. It’s easy enough to study the photographs of others that you follow on social media outlets such as Instagram, EyeEm, Facebook, Flickr, etc. If you find an artist that has a particular style that you admire, reach out to them and ask questions. Most folks are happy to share their techniques.
In addition, dig deep and visit your local library or bookstore to discover the collected works of past and current photographers. Even though many famous artists worked exclusively in film, there is is still so much to learn from their images in terms of composition, using light and shadow, etc.
With regard to tone, one of the best artists to study is Ansel Adams. His techniques were so refined that it’s easy to see why he is considered to be one of the best B&W photographers of all time. If you are interested in B&W portraiture, I recommend checking out artists such as Duane Michals and Arnold Newman. If you are interested in heavy image manipulation, check out Jerry Uelsmann to see what he was able to accomplish within the limitations of film photography.
These great artists represent only a starting point for study. Take some time to see what’s out there and find artists that inspire and amaze you with their work. Study their techniques and see how you might incorporate some of them into your own B&W work. Above all, keep shooting!
About The Author
A long-time photographer with a particular love of black and white imagery, Rob DePaolo is passionate about the new medium of mobile photography and is always on the lookout for new tools and techniques for the creation of great photos. Rob loves sharing his ideas and experiences in order to help others go from taking simple snapshots with their mobile phones to creating true art.
RobDePaoloPhotography.com | Instagram | EyeEm | AMPt
If you enjoyed this tutorial, please join over 3729 subscribers who receive my free iPhone photography email tips that will teach you how to take stunning photos with your iPhone.
17
MAR